Homemade chicken stock is not complicated and you don’t have to own a stock pot or fret about doing it perfectly.
Simply use the biggest soup pot you’ve got and follow this simple guide to making, storing and using this essential cooking staple.

The difference between chicken broth, stock, and bone broth?
I will forego any technical definitions here because there are so many variations (and opinions) and we need more freedom than fret on this subject. I want to encourage you to think of these terms as stages rather than definitions.
BROTH: The thinner version, usually involving more meat during a shorter cooking time (2 hours or less) and doesn’t gel when cooled.
Cook a whole chicken or cut pieces with aromatics until the chicken is cooked through. The leftover liquid is used as a base for stock, lighter soups, boiling noodles, thinning sauces, etc.
It tastes chicken-y, yet lightly flavored enough to let other ingredients shine. But don’t throw those bones away!
STOCK: The thicker, silkier, next step in culinary evolution with an abundance of bones, is simmered for longer periods of time (4-6 hours) and gels when cooled.
Save all your chicken bones (from above-mentioned broth or other meal prep), uncooked backs and wing tips, as well as wilted celery or leftover roast carrots to throw in this pot of goodness.
Bones with just a small amount of clingy meat bits are ideal because you will not want to eat chicken cooked this long; it’s not dangerous, just mealy and unappetizing.
Use stock as a base for hearty soups, luxurious sauces, and gravies—the gelatin from the bone joints and the roasting process is the one-two punch of making great stock.
At this point, the decision to go from stock to bone broth is made by whether I have the time to strain and cool it. If not, it stays on the stove. Handy, right?!
BONE BROTH: When a great stock becomes even more nutritious because the bones have a chance to release more minerals when cooked up to 24 hours. Same uses, though preferred for sipping when someone is using it for medicinal purposes. Now you can throw the bones away.
What is clarified stock? Purely aesthetic in purpose, clarifying your stock will make it less cloudy for better presentation in clear broth soups. Here’s How-To Clarify Broth.
Are broth and stock interchangeable in a recipe?
Basically, yes. Keep in mind there will be differences in the texture, so you may need to adjust thickeners in some manner, but you won’t ruin a recipe if you use one or the other.
If you’ve made a beautifully concentrated gelled stock and a soup recipe calls for 4 quart of broth or stock, here is how I approach that.
How much concentrated stock to use in soup recipes?
If making chicken soup, add 2-3 cups of bone broth first, then enough thinner chicken broth to make up the 3 or 4 quarts. Gelatinous bone broth will always make a soup thicker, so it depends on how concentrated the bone broth is and what kind of chicken soup I’m making.
For instance, chicken noodle soup (chicken, carrot, celery, noodles) is a basic soup where the broth/stock is a crucial component, so I start with 3 cups of the stock.
Chicken tortilla soup has lots of flavor and lots of stuff in it, so while the bone broth will make it better, it won’t be as noticeable because of the stronger combination of flavors so I use only 2 cups of stock and the rest would be broth or organic stock from the store.
Have a cold or recovering from surgery? You’ll feel better sipping on either one once it’s seasoned with a little sea salt. *If the stock texture is too thick to drink, add water to thin.


A Simple Guide to Homemade Chicken Stock:
- Roasting pan
- Stainless steel soup pot—Any size pot will work, but 8 quarts or more will maximize your efforts.
Note about pressure cookers: While a pressure cooker will make stock in less time, due to the limited filling capacities and size of most cookers, I still prefer to use my stock pot. Here are two recipes using a pressure cooker: Instant Pot Pressure Cooker Bone Broth by Nom Nom Paleo and Pressure Cooker Bone Broth by Food Renegade
- Strainer
and (optional) cheesecloth
to lay in the strainer to catch the fine sediment.
- Container large enough to strain the stock into and hold the stock while cooling, like a Rubbermaid Commercial Clear.
- Scoop to transfer the contents to the strainer.
- Fat separator (optional); I don’t remove all the fat from my stock, but I do remove some of it. Either use a fat separator
or wait to remove the solid fat off the top once it has cooled completely in the fridge.
- Containers, jars, or freezer bags
for storage. (Don’t forget to mark with the date.)
- Opt for organic or pasture raised chicken, organic vegetables, and filtered water for stock—whatever is in the chicken, vegetables and water will end up concentrated in the stock.
- Roast the bones and vegetables before adding to the pot for the best flavor—this is a must.
- Adding a small amount of acid like lemon juice or apple cider vinegar
will help leach the minerals from the bones, but it’s not a deal breaker.
- Skim off the scum that rises to the top if it seems gross to you. It won’t hurt anything, it’s just a collection of proteins.
- Don’t boil, only bring to a boil and then gently simmer for the remainder of time.
- Close the door to your bedroom and bathroom so your clothes and towels don’t smell like chicken soup. (Been there.)
- To learn how to pressure can chicken stock, check out this tutorial at Life on a Homestead.
- When ready to strain the stock, grab that pan you used for roasting the bones for the discards to cool in—throwing hot bones in the trash can melt the plastic bag (trust me on this).
- Transfer the contents with a 2 or 4 cup scoop rather than trying to pour from a heavy pot with splashy hot bones into a strainer precariously balanced over a bowl.
- Don’t press the contents when straining, let gravity do the work to avoid tiny bits of sediment pressing through. *You can eat the strained vegetables and meat left behind, but it’s rarely appealing.
- Cool as quickly as possible using an ice water bath in the sink, or add a few ice cubes and pour into a shallow container to cool within 2 to 3 hours. Don’t put hot stock in the fridge, it will bring down the temp in the entire fridge to potentially dangerous levels.
- Homemade stock can be stored in the refrigerator 4-5 days, frozen 6-9 months, or pressure-canned for 1 year, for best results.
- Once cooled, freeze stock in various increments—ice cube trays
work great when needing a few tablespoons; 1/2 cup, 1 cup, 2 cups are common in recipes; 6-8 cups work best for soups.
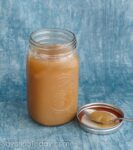
- Containers and jars should not be filled to the top so the liquid has an inch of space to expand. Only use glass jars with straight sides (no shoulders like the one in the photo) in the freezer to avoid risk of breakage.
- Storing stock in freezer bags that can lie flat is ideal. Remove as much air as possible before sealing. To prevent the bags from sliding into lumps, place the filled bags flat on a rimmed baking sheet. Once frozen, stack the bags more efficiently in a plastic magazine file
or organizer tub
.
Note about freezing stock in bags: Stock in a freezer bag will almost always leak when defrosted and in my experience bags can’t be trusted, there’s always a compromised corner.
It’s important to not over-fill the bags—2-4 cups per quart and 6-8 cups per gallon bag doesn’t stress the seams and defrosts quickly.
Defrost in a rimmed pan

This recipe is adapted from Sally Fallon’s Nourishing Traditions cookbook.
Homemade Chicken Stock
Ingredients
- 1 whole whole chicken -- or 2-3 pounds of chicken bones such as necks , backs, wings, and breast bones
- 4 to 6 quarts filtered water
- 1 tablespoon sea salt
- 3-4 stalks celery , coarsely chopped
- 2-3 large carrots , coarsely chopped
- 1-2 large onions , quartered
- 1 bulb bulb garlic , cloves separated and halved
- 1 tablespoons apple cider vinegar
- 2 teaspoons dried thyme
- 1 bunch parsley
Instructions
- IF USING A COLLECTION OF BONES, SKIP TO STEP 4.Divide the chicken into 9 pieces -- 2 wings, 2 thighs, 2 legs, 2 breasts, 1 back. (If the chicken neck is included, cut or break into several pieces.) Place chicken pieces in a large (6-8 quart) pot with water and salt.
- Boil for 30-40 minutes or until chicken is cooked through. Skim off any brown foam from the broth. Transfer chicken to a platter and allow to cool until easy to handle; reserve broth in the pot.
- Strip meat from bones and reserve for other recipes. NOTE: I do not recommend using the meat for the stock because the texture becomes dry and mealy when cooked too long and doesn't add to the quality of the stock.
- IF USING A COLLECTIONS OF BONES, START HERE: Place bones, celery, carrots, onions, and garlic in a roasting pan with 1/2 cup of water to cover the bottom of the pan. Bake at 400°F for 30-45 minutes or until bones and vegetables are a dark golden brown.
- Be sure to check periodically to add a little water to the pan so the bottom does not burn. When the bones are dark golden brown, transfer bones and vegetables to the pot with the broth. Add 1 cup of water to the roasting pan, stirring and scraping to loosen any browned bits.
- Pour this roasting liquid into the pot and add the apple cider vinegar and thyme. Fill the pot with enough filtered water to cover the contents plus about 2 inches above. (If starting with just bones, there will not be broth to add water to, just fill the pot with filtered water.)
- Bring to a boil. Reduce heat and simmer for 6 to 24 hours (remove any brown foam with a slotted spoon). The longer it simmers, the richer and more flavorful it will become. Add the parsley the last 10 minutes of simmering.
- Allow the stock to cool slightly, then strain. Discard solids. Use a separator to remove fat or let cool in the refrigerator and remove the congealed fat that rises to the top. NOTE: I do not recommend using the solids for soups or other recipes when they've been cooked so long due to texture, lack of flavor, and the nutrients have already been released into the stock.
- Stock can be stored in the refrigerator for up to 5 days or frozen for later use.
Notes
Nutrition

Here’s just a few recipes for using Homemade Chicken Stock:
This post contains affiliate links. If a purchase is made through these links, I receive compensation without any added cost to my readers. For more information regarding ads and advertising affiliations, please see our Disclosure Policy. Thank you for supporting what I do here at Savoring Today.
Diane Dittmar says
I haven’t made this recipe yet but wanted to acknowledge the amount of information and helpful tips you’ve provided. This is the best recipe I’ve ever come across and cannot wait to save up my collection of bones and vegetables to make this broth. You’ve really outdone yourself and deserve a round of applause for the amount of work you put into writing up this recipe, great job.
Judy Purcell says
Diane, thank you so much for taking the time to read and comment about the recipe. Your kind words were so encouraging to me today. ♥
Carol Cuevas says
Whoops! I put the lemon juice and thyme in for the roasting stage. The thyme was freeze dried and tends to soak up moisture pretty good, so maybe that’s why it turned out good…..I absolutely needed some water by the 20 minute mark of roasting.
I let it simmer for 8 hours, because by the time it cooled, it was almost time to go to bed. There were fats to collect after the 8 hours, but way more after refrigerating. Otherwise, it looked like my Grandma’s stock. Smelled amazing, too. If an amateur wants to break down a chicken, prepare vegetables, roast them them simmer them for 8 hours, it takes all day.
This is the first time I’ve made chicken stock. With prices always rising, I decided to bite the bullet and do the somewhat disgusting work of preparing the chicken bones for the the stock for cost purposes. It’s not time to waste anything.
The first thing I made with the stock was Risotto. What a flavor explosion. I can only imagine soups and gravies and other sauces to be superstar elements of a meal.
I recommend this recipe.
Judy Purcell says
Hi Carol, Thanks for letting me know how the recipe went for you! I’m glad it turned out and your risotto was so good with it!
Jackie says
im confused, in the stock guide above the recipe, you say to roast bones and veggies before making the stock, but in the recipe you dont roast before adding to pot….
Is the roasting of bones for the LEFTOVER bones from the initial stock made? Confused, sorry…
Judy Purcell says
Hi Jackie, I understand how it could be confusing. In the instructions under “If using a collection of bones, Start Here:” it should be step 4 instead of step 1. I begin the instructions as though you are starting with a raw whole chicken in step 1, but if you already have the bones separated, start at Step 4 which describes putting the bones in a roasting pan with the celery, carrots, onions, and garlic to roast. Either way, once the chicken is removed from the bones, the bones are roasted for the stock. Does that make sense?
I’ll try to update the recipe to make it more clear. 🙂
Jackie, again says
ok disregard my post lmao JUST saw the rest of the recipe!! my bad!
matt says
I just made about 3cups of gelatinous bone broth. When I go to use the stock/bone broth in my chicken soup, say 3 to 4 qts. of soup, how much stock/bone broth should I use?
Judy Purcell says
Hi Matt. Way to go on the bone broth, we like it when it gels like that. 🙂 As with most things in cooking, it depends. If you’re using for chicken soup, I’d say mix it with an organic store brand — Add 2-3 cups of bone broth first, then enough of the organic broth/stock to make up the 3 or 4 quarts. Gelatinous bone broth will always make a soup thicker, so it depends on how concentrated the bone broth is and what kind of chicken soup I’m making.
For instance, chicken noodle soup (chicken, carrot, celery, noodles) is a basic soup where the broth/stock is a crucial component, so I’d use all 3 cups of the stock. Chicken tortilla soup has lots of flavor and lots of stuff in it, so while the bone broth will make it better, it won’t be as noticeable because of the stronger combination of flavors so I’d use only 2 cups of the stock and the rest organic stock from the store. I hope that helps!
If you have more questions or need a real-time answer, feel free to message me through Facebook messenger where I receive more timely notifications. 🙂
matt says
Thanks!! That was quick enough for me. Atferall I cooked bones on my woodstove for about 24hours.😎
Insatiable Gypsy says
Hi! Great article and advice! I can not find an answer to my question anywhere, maybe you can help! I’ve been saving chicken bones from the organic whole chickens I buy at the store as well as leftover bones from cooked ribs. I have several baggies full in the freezer. My question is….how long can they stay frozen before I use them? I’ve been collecting them since May, in separate baggies with the date. I wasn’t sure how long I can keep them frozen. Thanks!!
Judy Purcell says
Hi! That’s a good question. I have saved bones for up to a year in the freezer without any problems. If you end up with a lot of ice crystals forming on the bones, just rinse the frozen bones under running water until the ice crystals melt away and then use the bones. Getting rid of the ice will remove any off-putting flavors.
Judy Garrett says
Could I leave out the salt for a low sodium and potassium version?
Judy Purcell says
Hi Judy, yes, you can leave out the salt because it is in there for flavor and will not affect the broth otherwise. If you have no-salt seasoning, you can always add that once the broth is done if you’re serving the broth by itself. We do this most often when someone is ill and need to keep fluid intake up–salt or a no-salt seasoning will make it more palatable. 🙂
Mary says
I’ve looked everywhere but can’t seem to find an answer to my question. If you want to make soup from your homemade gelled stock, do you dilute it? And if so, what is the ratio?
Samantha Ciarallo says
I am wondering the same thing 🙂
Judy Purcell says
Dang, I can’t believe I missed Mary’s question! Samantha, I’m glad you asked again and I saw it!
So I’ll start with, it depends. If you’re using a gelled stock for chicken soup, I’d say mix it with an organic store brand — Add 2-3 cups of bone broth first, then enough of the organic broth/stock to make up the amount you need. Gelatinous bone broth will always make a soup thicker, so it depends on how concentrated the bone broth is and what kind of chicken soup I’m making.
For instance, chicken noodle soup (chicken, carrot, celery, noodles) is a basic soup where the broth/stock is a crucial component, so I’d start with more like 3-4 cups of the stock. Chicken tortilla soup has lots of flavor and lots of stuff in it, so while the bone broth will make it better, it won’t be as noticeable because of the stronger combination of flavors so I’d use only 2 cups of the stock and the rest organic stock from the store or thinner homemade broth.
I hope that helps!
If you have more questions or need a real-time answer, feel free to message me through Facebook messenger where I receive more timely notifications.
Samantha Ciarallo says
Thank you so much for getting back so quick!!!!!
I appreciate your help and your recipe! Thank you ☺️
Maureen | Orgasmic Chef says
This is a terrific post and will be helpful to every home cook. Everything we’d want to know about making our own chicken stock.
mjskitchen says
WOW! You really put a lot of effort into your stock. I bet it’s awesome! I’m a lazy stock maker and very basic with ingredients and process. I’m sure mine isn’t as flavorful as yours, especially with the roasted vegetables, but it’s quick and good enough. 🙂 Some day I’ll have to set aside some time to do this so I can experience the difference. Great details and information!
Liz (Good Things) says
An excellent post, Judy. I hadn’t thought of using chicken feet in my stock. Thank you x
Judy Purcell says
Thanks Liz! It was only a little creepy because they looked like alien hands floating in there … but no worries. Ha! 🙂
Karen (Back Road Journal) says
You did a terrific job with this post Judy. Anyone who has never made broth or stock has all the answers right here. Well done!
Judy Purcell says
Thank you, Karen, I really appreciate your kind encouragement!
John/Kitchen Riffs says
Excellent discussion of the differences between broth, stock, and bone broth. And love the chicken feet tip! I used to see them in grocery stores all the time when I was a kid; rarely see them now. There are stores where I can get them, of course, but they’re just not standard at most stores these days. Good post — thanks.
Judy Purcell says
Thank you, John! Yeah, it is not likely to find chicken feet at major stores these days–shelf space is hard won, but they are worth seeking out. 🙂
masufa says
I just saw them at WalMart.
Judy Purcell says
Thanks for letting us know!