
If I had known (or believed) how simple it was to make Greek yogurt at home, I would have started years ago. Not only is the process rewarding, the results are superior in texture and flavor.
In this post, I’ll show you exactly how I make Greek yogurt as part of my weekly meal prep routine. I’ll also provide resources for special equipment and information to make yogurt that suits your preferences.
Without a doubt, this yogurt recipe is for folks who eat yogurt consistently (or want to) and also want to save money by making their own.
We stopped buying the small, individual containers for more economical tubs to better control the sweeteners and add-ins a while back. But making our own took cost-cutting a step further and we’ve come to love the creamy texture and flavor of homemade more than any we could buy.
Making yogurt has become a regular part of weekend meal prep. It takes about 7 hours to make, but it’s mostly hands-off. This makes it super easy to manage around work schedules, household chores, or leisure activities.

Why Make Homemade Yogurt?
- Cost-Effective: Store-bought yogurt can add up, especially if you prefer organic or specialty varieties. Making yogurt at home can save you money in the long run, as a gallon of milk produces a large batch of yogurt for a fraction of the cost. Depending on the starter you use, homemade yogurt produces the starter for the next batch, so you always have what you need to make more.
- Ingredient Control: Homemade yogurt allows you to control what goes into it. You can skip added sugars and artificial flavors, resulting in a cleaner and healthier product. Plus, you can use the milk you choose, whether cow’s, goat’s, or even a plant-based alternative.
- Customizable Flavors: Do you love fruit-flavored yogurt or want a touch of honey? Making it yourself gives you endless customization options. Add fresh fruit, vanilla, essential oils, or spices to suit your taste buds.
- Eco-Friendly: Skip the single-use plastic containers that store-bought yogurt often comes in. Making yogurt at home reduces waste and gives you more control over the type of container to store it in—like glass instead of plastic.
This post may contain affiliate links. See our disclosure policy for more information.
Here’s what you’ll need to get started:
Ingredients:
- Whole Milk (Organic, but avoid Ultra-pasteurized)
- A packaged yogurt starter, fresh yogurt, or whey with live cultures (as a starter)
Equipment:
- 8 cup measure or glass container
- Stainless steel pot
- Instant-Read Thermometer
- Stainless steel whisk or wooden spoon
- 2-3 glass jars or a glass container with a lid
- A warm place to incubate at a consistent temperature (such as an oven with a low-temperature setting (85-110°) like a “proof” setting, an oven with the light on, a heating pad, or a yogurt maker)
- Yogurt strainer (or cheesecloth) OPTIONAL—This is the yogurt strainer I use.

These are the simple steps I use to make Greek yogurt:
STEP #1—Heat the Milk
- Pour 8 cups of milk into a pot and heat it on low heat until it reaches between 175-180°F on an instant-read thermometer (this will take about 20 minutes). I do not bother watching or stirring it because it’s on low heat (3 out of 10 on my stove).
- Set a timer and check the temperature after 20 minutes; it may have to heat for a few more minutes, but I watch this more closely. It will begin to steam and may foam, but you don’t want it to boil.
- As soon as it is between 175-180°F, slide it off heat.
- NOTE: Heating temperatures vary based on the starter you use. I use Cultures For Health Heirloom Greek Style Yogurt Starter, which recommends heating to 160°F, but I find that the yogurt is thicker if the milk evaporates longer.
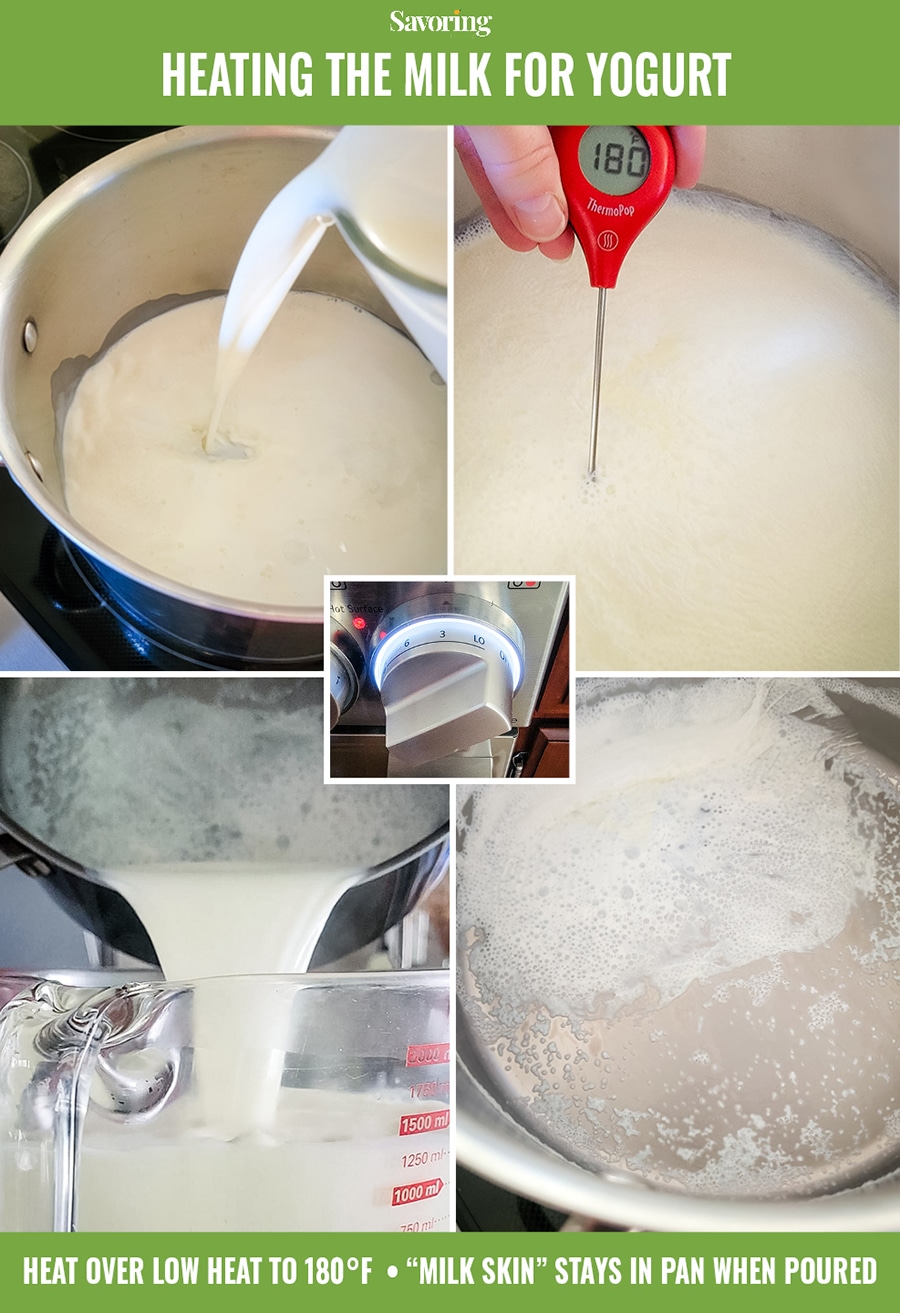
STEP #2—Cool the Milk
- Pour the milk from the pot back into the glass measuring cup or container. It will cool faster out of the hot pan, and as you pour it, the thin skin that formed on the top should remain in the pot. Let the milk cool on the counter until it is 110°F—this takes about 45 minutes, depending on room temp.
- Set a timer and check the temp after 40 minutes. Reaching the right temp may take another 5-10 minutes, but I watch and check more closely.
- NOTE: Cooling temperatures vary based on the starter you use. I use Cultures For Health Heirloom Greek Style Yogurt Starter, which this recipe is based upon.

STEP #3—Add the Starter
- Stir in 2 fresh starter packets (check package for milk to starter ratio), OR ¼ cup of fresh yogurt or whey with live cultures (2 tablespoons per 4 cups milk) from a previous batch. The live cultures in the starter yogurt will ferment the milk and turn it into yogurt.
- Pour this mixture into glass mason jars—I use 2-quart jars and 1-pint jar—I strain the yogurt from the 2-quart jars (for thicker, Greek style) and leave the pint jar unstrained for my next batch or recipes.

STEP #4—Incubate
- I use the “proof” setting on my oven and set a timer for 5 hours (it may take up to 12 hours when using a granulated starter).
- Check to see if the yogurt is “set” by tilting the jar—set yogurt will pull away from the side of the jar and look solid instead of milky.
- Remove it from the oven and set it on the counter for 1-2 hours before refrigerating so it can cool. After that, it goes in the fridge to chill thoroughly (and continues to set up/thicken).
- NOTE: Incubation temperature will depend on the type of yogurt starter. If using the granulated Greek yogurt starter packet from Cultures for Health, the initial incubation may take longer to set up. When using fresh active yogurt (from a prior batch), it will be set in less time. The longer it incubates (up to 12 hours), the tangier the yogurt will be. For me, the perfect set and flavor happens in just 5 hours.
STEP #5—Chill
- The yogurt will continue to set up upon refrigeration but is ready to eat anytime. Wait until it is thoroughly chilled before straining.

STEP #6—Strain (optional)
- Once chilled, I pour the yogurt into the strainer basket and set it back in the refrigerator (see photo) to drain the whey. The strainer is big enough for 2 quarts of yogurt and takes 3-5 hours to drain off the whey and thicken further. You don’t have to be exact with this; I often let it sit overnight in the fridge. You can also use cheesecloth in a colander for this.
- NOTE: Yields about 4 cups of strained yogurt

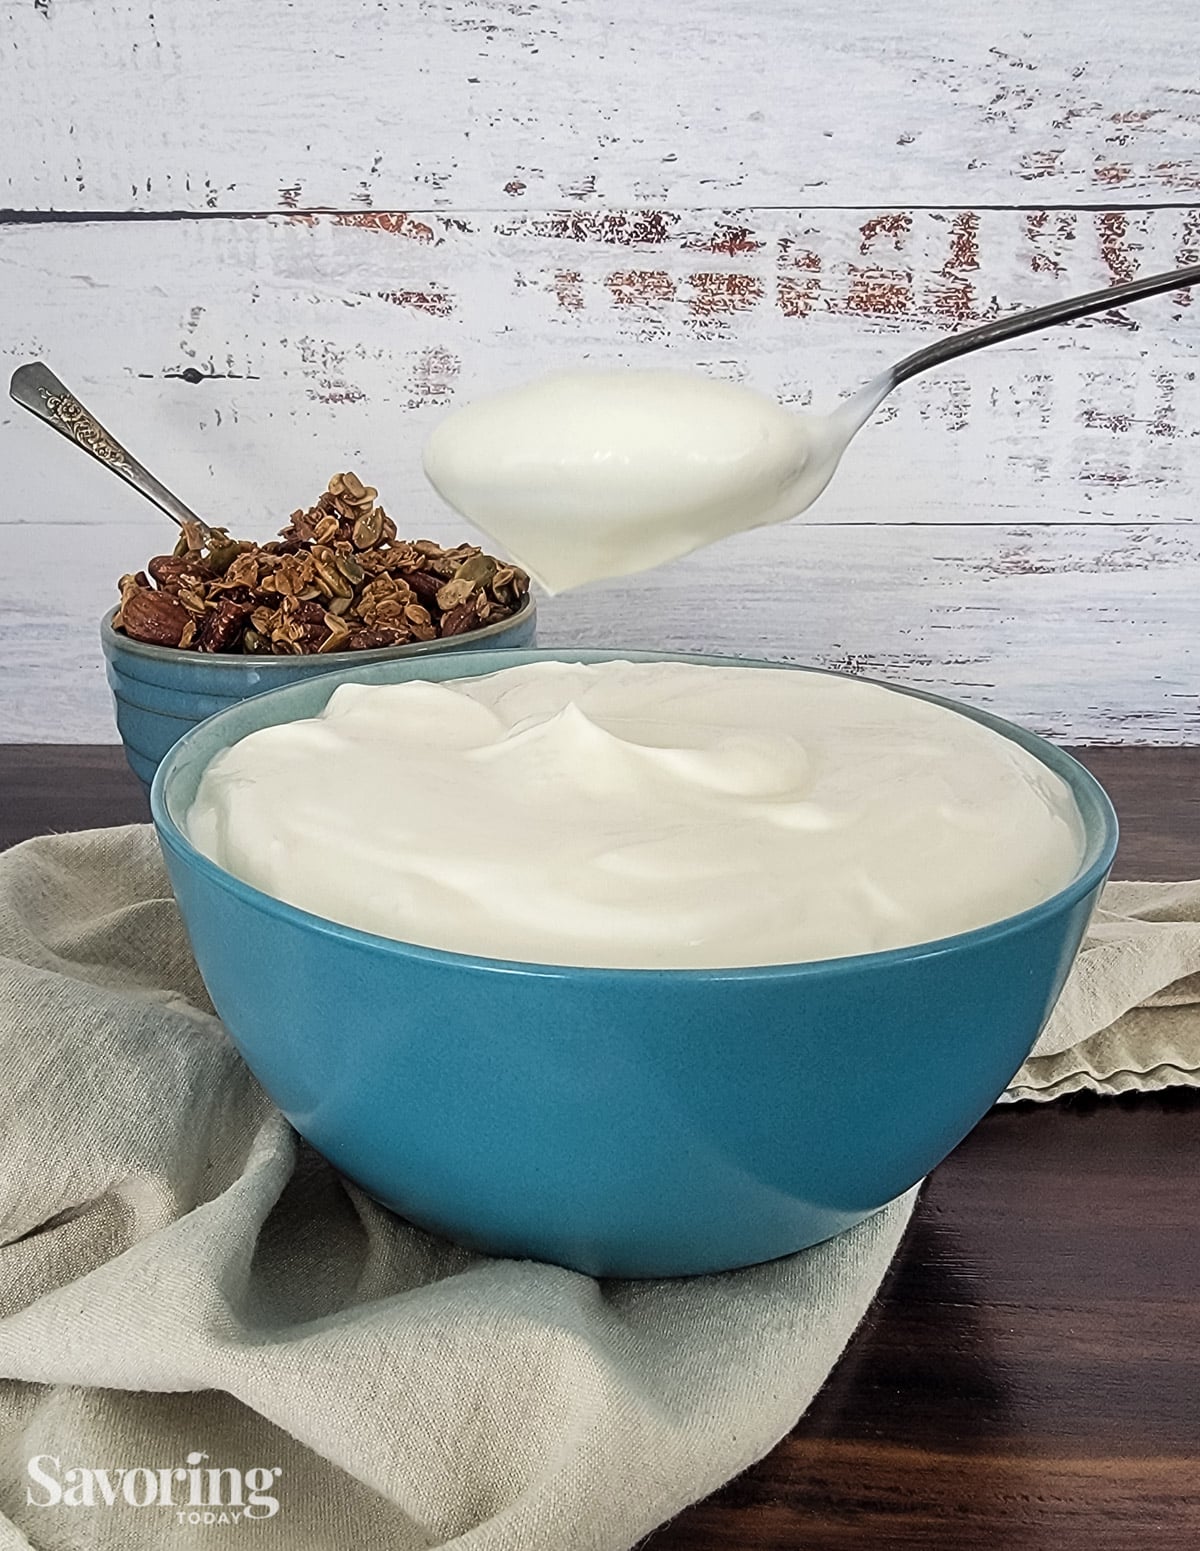
STEP #7—Stir, Mix, and Store
- Once strained, transfer from the strainer into a bowl by tilting the strainer insert over a bowl and gently shaking it until the yogurt releases and plops into the bowl. Stir it well and mix in any sweetener and flavors (my favorite is honey, vanilla, and tangerine oil).
- NOTE: Don’t worry if the yogurt doesn’t look creamy; it must be stirred until it is smooth and silky.

Why strain the yogurt?
There are two reasons to strain the whey off the yogurt. One is for the desired texture, and the other reason is to increase the protein content of the concentrated yogurt.
A thicker yogurt makes a better substitute for sour cream or cream cheese when making dips or dressing recipes. Thinner yogurt makes a better substitute for buttermilk in sauces or marinades. This is why I strain 2 quarts and hold back the smaller pint jar, so I have both available.

What to do with the whey?
Yogurt whey is also called “acid whey” because it is naturally acidic due to the fermentation process (cheese whey is called sweet whey). There are many uses for it, so don’t throw it away!
- Make more yogurt. Yes, I’ve been successful making yogurt with my leftover whey when I forgot to save back a starter. I’ve heard from others that it doesn’t always work as well as fresh yogurt, but it has worked perfectly for me.
- Water your plants. Use acid whey to water your plants and garden, especially acid-loving plants, like blueberries, tomatoes, and hydrangeas. Remember, however, to dilute whey when using it to water plants (1 part whey to 1 part water) and only add 1 inch of whey-water per week.
- Mix it into smoothies and electrolyte drinks like our Switchel recipe.
- Add it to pasta water, soups, hummus, salad dressings, or pickles.
- Substitute whey for water when making sourdough.
- Substitute whey for vinegar when making bone broth.
TIPS & Variations
The best resource I’ve found for making yogurt and all things cultured is Cultures for Health. They have reliable, active cultures and detailed advice on using a wide range of dairy and plant-based milk, incubation methods, kits, and equipment.
- Don’t worry if the yogurt doesn’t look creamy; it must be stirred in order to be smooth and silky.
- Incubation temperature will depend on the type of yogurt starter. If using the granulated Greek yogurt starter packet from Cultures for Health, the initial incubation may take longer to set up. When using fresh active yogurt (from a prior batch), it will set in less time.
- Temperatures vary based on the starter you use. I use Cultures For Health Heirloom Greek Style Yogurt Starter, which this recipe is based upon.
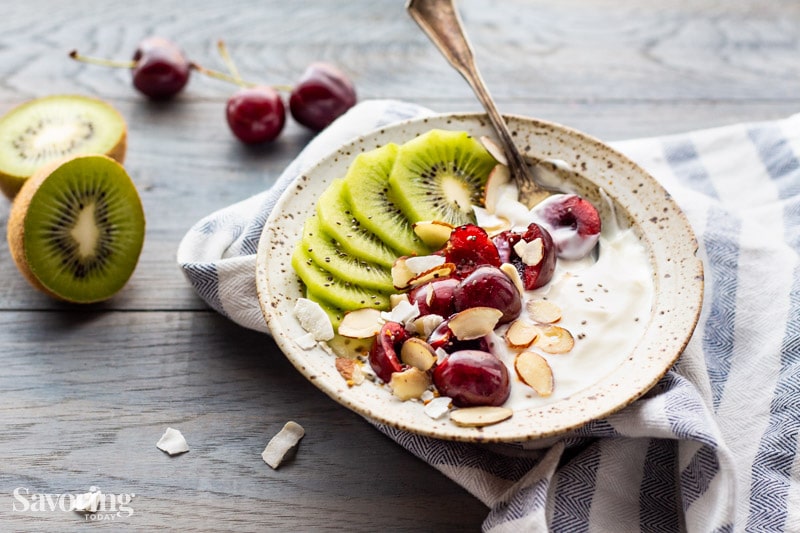
- Top your homemade yogurt with our Crunchy Brown Butter Maple Granola, or try one of these clever ways to use Greek yogurt.
Homemade Greek Yogurt
Ingredients
- 8 cups whole milk , avoid ultra-pasteurized
- 1/4 cup active plain yogurt — or granulated live starter , or active whey
Instructions
- HEAT THE MILK—Pour 8 cups of milk into a pot and heat it on low heat until it reaches between 175-180°F on an instant-read thermometer (this will take about 20 minutes). I do not bother watching or stirring it because it’s on low heat (3 out of 10 on my stove). Set a timer and check the temperature after 20 minutes; it may have to heat for a few more minutes, but I watch this more closely. It will begin to steam and may foam, but you don’t want it to boil.
- As soon as it is between 175-180°F, slide it off heat.
- COOL THE MILK—Pour the milk from the pot back into the glass measuring cup or container. It will cool faster out of the hot pan, and as you pour it, the thin skin that formed on the top should remain in the pot. Let the milk cool on the counter until it is 110°F—this takes about 45 minutes, depending on room temp. Set a timer and check the temp after 40 minutes. Reaching the right temp may take another 5-10 minutes, but I watch and check more closely.
- ADD THE STARTER—Use 2 fresh starter packets (check package for milk to starter ratio), OR use ¼ cup of yogurt or whey with live cultures (2 tablespoons per 4 cups milk) from a previous batch and whisk it into the cooled milk. The live cultures in the starter yogurt will ferment the milk and turn it into yogurt. Pour this mixture into glass mason jars—I use 2-quart jars and 1-pint jar (I strain the yogurt from the 2-quart jars for thicker, Greek style and leave the pint jar unstrained for my next batch or recipes).
- INCUBATE—I use the “proof” setting on my oven and set a timer for 5 hours (it may take up to 12 hours when using a granulated starter). Check to see if the yogurt is “set” by tilting the jar—set yogurt will pull away from the side of the jar and look solid instead of milky. Remove it from the oven and set it on the counter for 1-2 hours before refrigerating so it can cool. After that, it goes in the fridge to chill thoroughly (and continues to set up/thicken).
- CHILL—The yogurt will continue to set up upon refrigeration but is ready to eat anytime. Wait until it is thoroughly chilled before straining.
- STRAIN (optional)—Once chilled, pour the yogurt into a yogurt strainer basket and set it back in the refrigerator to drain the whey. My strainer is big enough for 2 quarts of yogurt and takes 3-5 hours to drain off the whey and thicken. You don’t have to be exact with this; I often let it sit overnight in the fridge. You can also use cheesecloth in a colander for this as well. NOTE: Yields about 4 cups of strained yogurt.
- STIR, MIX, & STORE—Once strained, transfer from the strainer into a bowl by tilting the strainer insert over a bowl and gently shaking it until the yogurt releases and plops into the bowl. Stir it well and mix in any sweetener and flavors (my favorite is honey, vanilla, and tangerine oil). NOTE: Don’t worry if the yogurt doesn’t look creamy; it must be stirred until it is smooth and silky.
Notes
• Heating temperatures vary based on the starter you use. I use Cultures For Health Heirloom Greek Style Yogurt Starter, which recommends heating to 160°F, but I find that the yogurt is thicker if the milk evaporates longer.
• Cooling temperatures vary based on the starter you use. I use Cultures For Health Heirloom Greek Style Yogurt Starter, which this recipe is based upon.
• Incubation temperature will depend on the type of yogurt starter. If using the granulated Greek yogurt starter packet from Cultures for Health, the initial incubation may take longer to set up. When using fresh active yogurt (from a prior batch), it will be set in less time. The longer it incubates (up to 12 hours), the tangier the yogurt will be. For me, the perfect set and flavor happens in just 5 hours.
• Don’t worry if the yogurt doesn’t look creamy; it must be stirred until it is smooth and silky.

Leave a Reply