
Our go-to Cream Cheese Fruit Tart is a gorgeous gluten-free dessert sure to impress on any occasion. The almond crust is so simple to make—just press in the pan and bake, no rolling or fretting. You’ll love how easy it is to make for slice and serve or as individual mini tarts for showers and brunches.
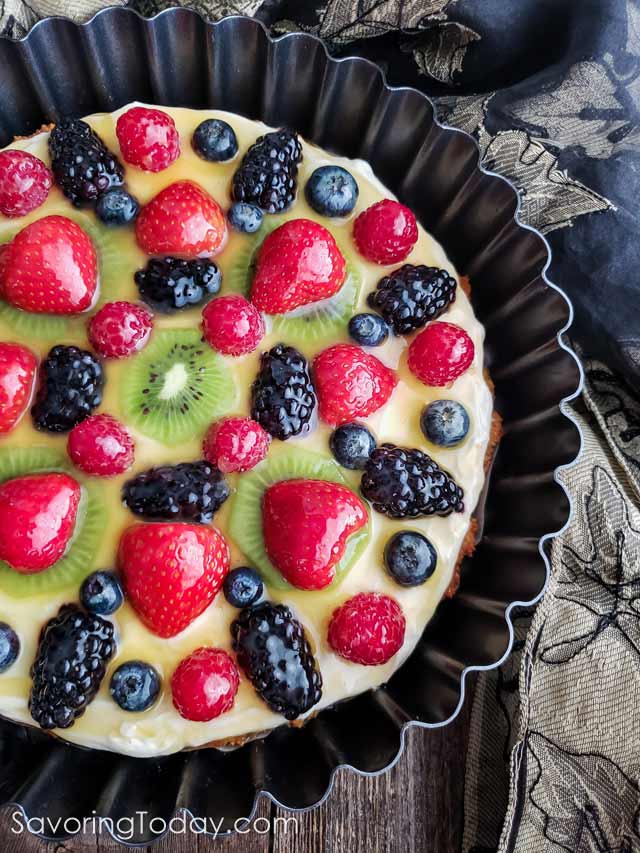
A fruit tart with luscious cream cheese filling topped with a tangy citrus glaze is always a brunch favorite because it satisfies without being overly sweet. The juicy goodness of the fruit shines through, so it’s ideal for brunch and a favorite for bridal shower menus.
Everyone Loves the Gluten-Free Crust
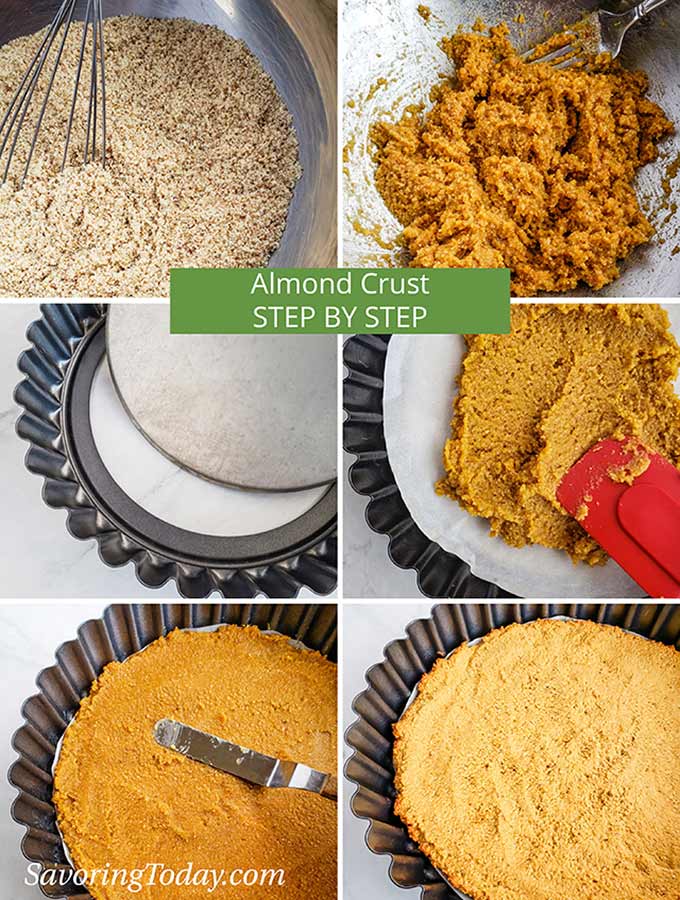
Creating a truly delicious gluten-free dessert can be challenging when so many gluten-free crusts fall short of the mark. Among gluten-free flours, almond flour produces superior results without any grittiness common with rice flour.
This gluten-free tart crust is tender and light, unlike more dense pastry or shortbread-type crusts, which makes it easier to eat when you’re balancing a plate on your lap at a party.
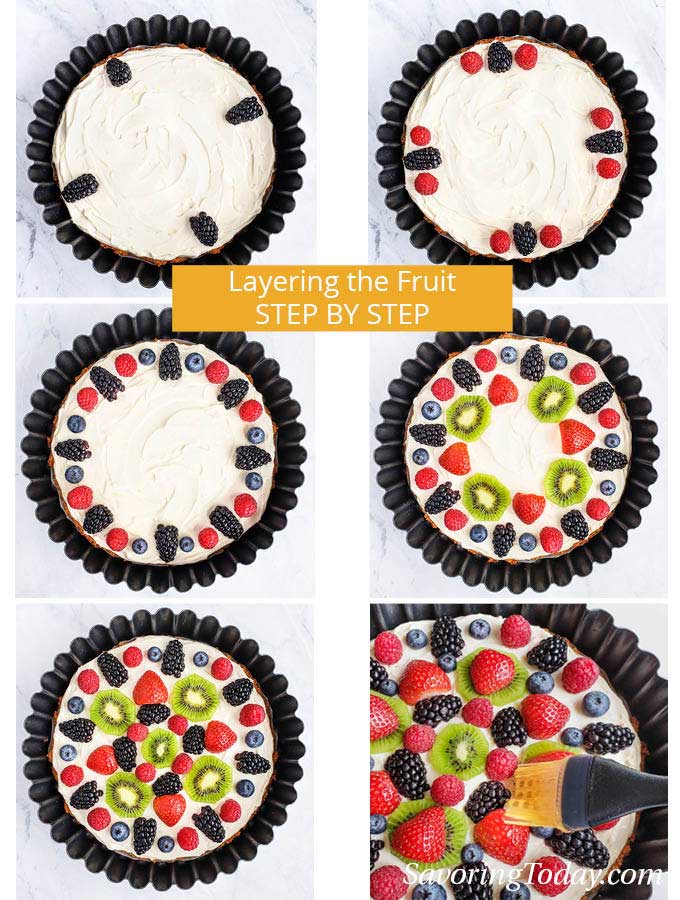
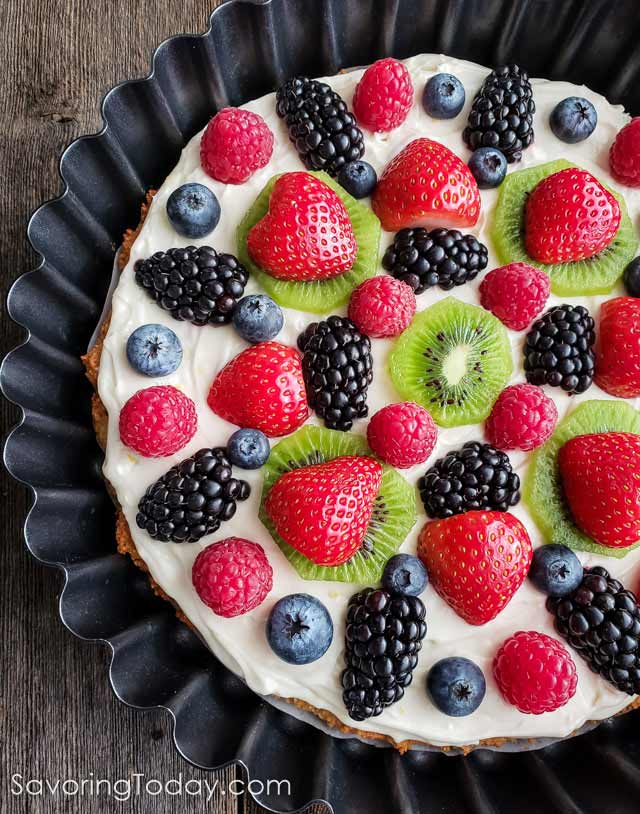
How to Layer a Fruit Tart
- Start with a single fruit to anchor the design, in this case, blackberries.
- Work from the outside in; add a single berry to divide the circle into quarters.
- Add the next selection of fruit (raspberries) beside the blackberries, working around the outer rim.
- Begin the second ring inside by placing the Kiwi to divide the inner circle into quarters, like STEP 2.
- Continue to fill in the space to create your preferred design. Remember, it’s okay to leave some white space.
The size of the rings will depend on the size and shape of the fruit.
This post may contain affiliate links. See our disclosure policy for more information.
How to Cut a Fruit Tart
- A tart pan
or spring-form pan
will make it easier to cut and serve clean slices instead of trying to slip a server down under the edge of a pie plate.
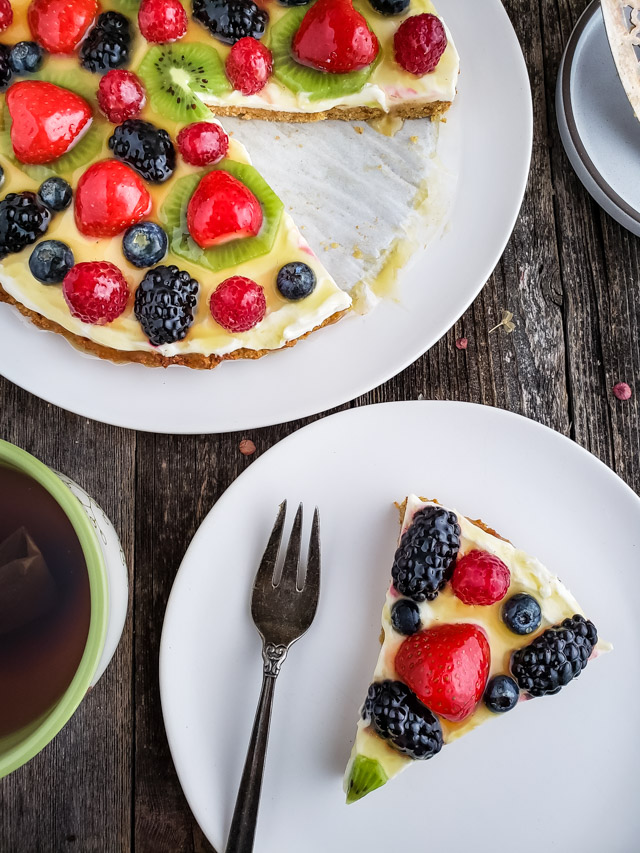
- Use a sharp knife to cut a wedge in the tart, slide a pie server under the slices, and slide straight out.
- Wipe the knife blade clean after each cut to avoid smearing cream cheese on the fruit of the next slice.

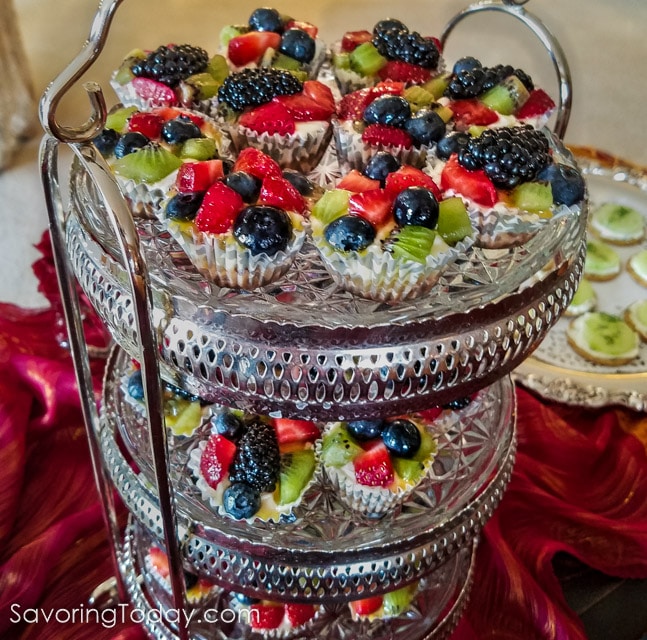
How To Make Mini Tarts
- Divide the crust into 10 to 12 (3-4 inch) mini tart cups. Place the tart cups on a rimmed baking sheet and bake the crust for about 10 minutes.
- Divide the filling evenly between the tart cups by spreading or piping into each cup.
- Arrange fruit on top of filling in a single layer.
- Brush glaze over fruit, or leave unglazed if serving within a few hours.
3 to 4-inch mini tart pans

Recipe Tips
- All the components can be made in advance and stored separately until ready to assemble.
- Berries will last the longest and maintain the best texture up to 3 days.
- Cut ripe peaches, plums, pears, and nectarines will weep more and should be served within 24-36 hours for best results.
- Apply the fruit tart glaze with a soft pastry brush to evenly coat and keep the fruit from browning or drying out.
Recipe Variations
- To make it Paleo and Dairy Free, substitute homemade coconut cream cheese, homemade cashew cream cheese, or other favorite dairy-free substitute for the cream cheese in the filling. Sub ghee or coconut oil for the butter.
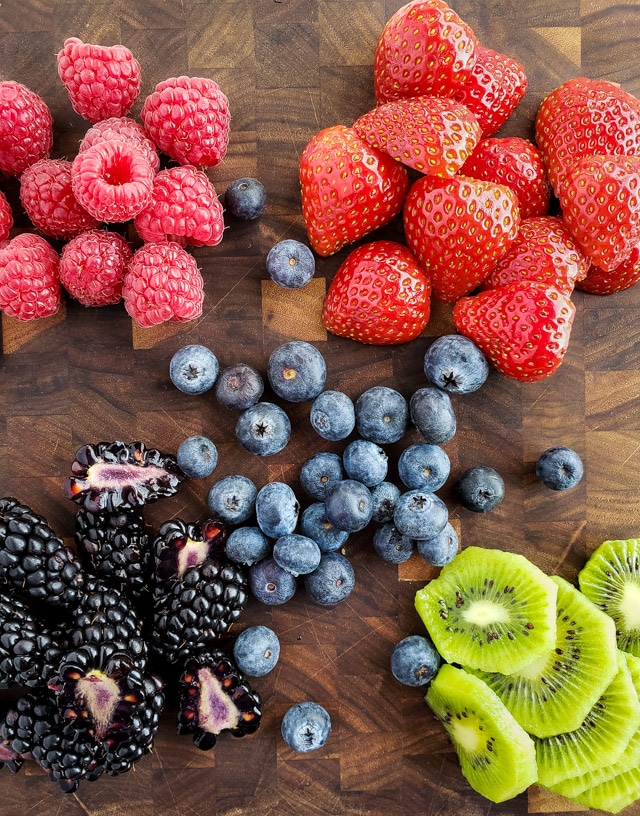
- Any combination of vibrant berries, mandarin oranges, peaches, plums, pears, mango, pineapple, nectarines, or kiwi will create your most inspired fruit arrangement.
- Use any favorite pastry crust—pie crust or shortbread crust works well too.
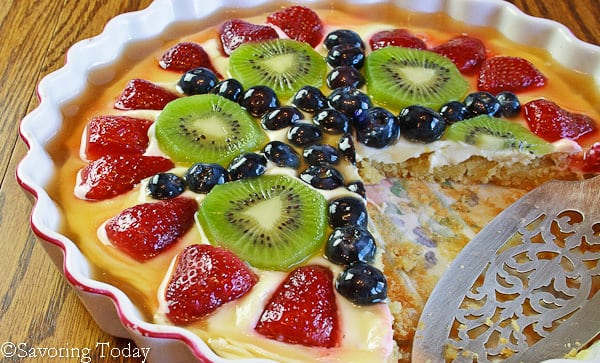
- Skip a step and leave it unglazed if serving right away. Photo example below.

Cream Cheese Fruit Tart with Almond Crust Recipe [GF]
Ingredients
For the Crust:
- 1 cup almond flour ,+ 2 tablespoons for High Altitude
- 1/8 teaspoon sea salt
- 1 large egg
- 1 tablespoon butter , melted, plus more for greasing the pan
- 3 tablespoons honey , or coconut palm sugar
- 1/4 teaspoon almond extract
For the Glaze:
- 1/2 cup orange juice or grapefruit juice , freshly squeezed, without pulp
- 2 tablespoons honey
- 2 teaspoons tapioca starch , or organic cornstarch
For the Filling:
- 8 ounces cream cheese , softened / room temperature
- 3 tablespoons honey
- 1 tablespoon lemon juice fresh squeezed
- 1 teaspoon lemon zest
- 1/2 teaspoon vanilla
For the Fruit Topping:
- strawberries , stems removed, halved, quartered, or sliced
- kiwi fruit , peeled and sliced across to create rounds
- blackberries , cut in half
- raspberries , leave whole
- blueberries , leave whole
Equipment: 8-inch tart pan
Instructions
- Heat oven to 350°F. Grease the bottom of 8-inch tart pan or line with parchment paper.
For the Crust:
- Mix 1 cup almond flour and 1/8 teaspoon salt in a mixing bowl to incorporate salt and break up any lumps in the flour (if using coconut palm sugar, add that into the dry ingredients here). In another bowl, blend 1 egg, 1 tablespoon butter, 3 tablespoons honey, and 1/4 teaspoon almond extract. Add wet ingredients to dry ingredients and mix until well blended. Spread in a tart pan and smooth with spatula to form an even crust.
- Bake in the oven for 10-12 minutes or until light golden brown at the edges and in spots. Remove from oven and cool completely on a wire rack before adding filling.
For the Glaze:
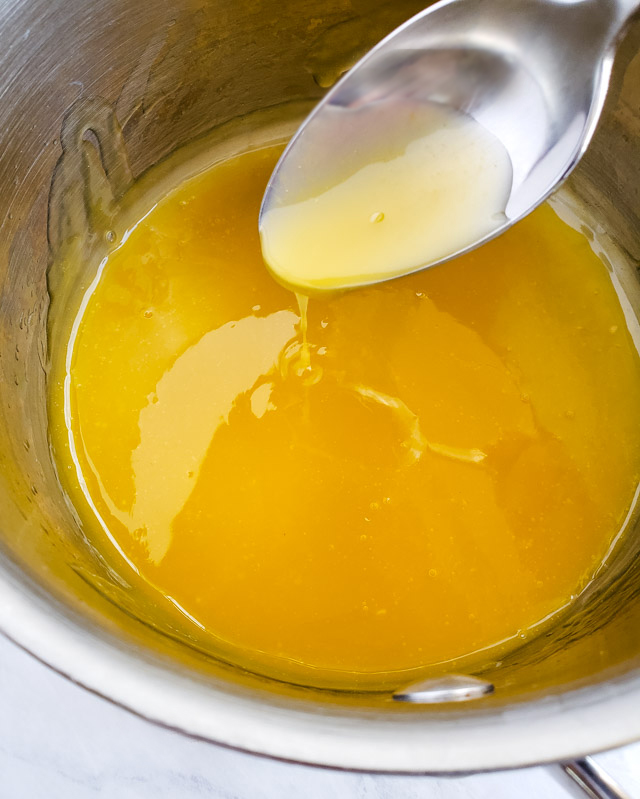
- Mix 1/2 cup orange juice, 2 tablespoons honey, and 2 teaspoons tapioca starch in a small saucepan over medium heat, stirring to combine. When mixture begins to boil, reduce heat to medium-low and simmer, stirring constantly, until glaze thickens–2-3 minutes. Transfer glaze to a bowl and allow to cool completely before glazing the tart.
For the Filling:
- Using a mixer, beat 8 ounces cream cheese until smooth. Add 3 tablespoons honey, 1 tablespoon lemon juice, 1 teaspoon zest, and 1/2 teaspoon vanilla to the cream cheese and mix until well blended. Set filling aside until crust and glaze are completely cooled. These steps can all be done in advance and reserved until tart is ready to assemble and serve.
For the Fruit Topping:
- Prepare fruit in the manner you prefer. In this application, strawberries were halved, kiwi was sliced, blackberries halved, raspberries and blueberries remained whole. (Blot fruit with a paper towel to remove excess moisture.)
Assembling the Tart:
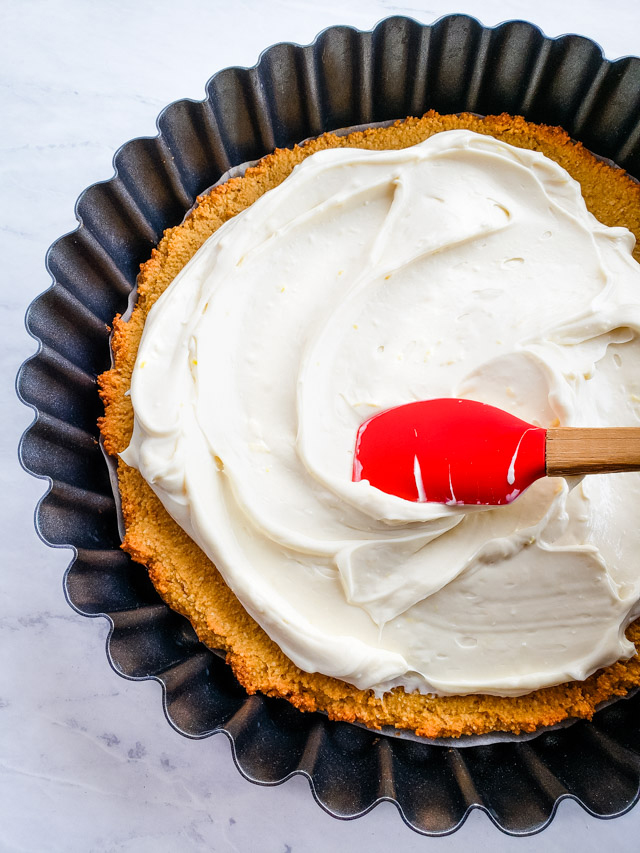
- Once the crust is completely cooled, spread cream cheese filling evenly over crust — an icing spatula works wonderfully here to create a smooth finish. Arrange prepared fruit over the filling in any design you choose. Whether you overlap the fruit, completely cover the filling, or allow it to peek through is up to you.
- Once all the fruit is in place, use a pastry brush to gently apply the glaze to the fruit, or use a spoon to drizzle glaze over the tart, just be sure to cover the fruit. Don’t be shy, the glaze is not just for looks, it also adds a pleasing citrus accent to the tart.
- Chill until ready to serve. Serve within 24-48 hours.
Video Displays Here or In Post
Notes
- All the components can be made in advance and stored separately until ready to assemble.
- Berries will last the longest and maintain the best texture up to 3 days.
- Cut ripe peaches, plums, pears, and nectarines will weep more and should be served within 24-36 hours for best results.
- Apply the fruit tart glaze with a soft pastry brush to evenly coat and keep the fruit from browning or drying out.
- To make it Paleo and Dairy Free, substitute homemade coconut cream cheese, cashew cream cheese, or other favorite dairy-free substitute for the cream cheese in the filling. Sub ghee or coconut oil for the butter.
- Any combination of vibrant berries, mandarin oranges, peaches, plums, pears, mango, pineapple, nectarines, or kiwi will create your most inspired fruit arrangement.
- Use any favorite pastry crust—pie crust or shortbread crust works well, too.
- Skip a step and leave it unglazed if serving right away. Photo example below.
- Divide the crust into 10 to 12 (3-4 inch) mini tart cups. Place the tart cups on a rimmed baking sheet and bake the crust for about 10 minutes.
- Divide the filling evenly between the number of tart cups by spreading or piping into each cup.
- Arrange fruit on top of filling in a single layer.
- Brush glaze over fruit, or leave unglazed if serving within a few hours.
Nutrition
Jeannie says
Very nice; thank you! I had to change things up because I realized I didn’t have things on hand but really wanted to try it. So sweetener was a mix of agave syrup and powdered xylitol, the fruit was glazed bananas, and the glaze was coconut rum and a little water thickened with corn starch. Oh, well; it worked! 😀 I plan to make it again with fresh berries, honey, and orange glaze.
Judy Purcell says
Hi Jeannie, I think it is a forgiving recipe that is easy to customize—I’m so glad the substitutions worked so well.
Donna Unger says
I was thrilled to find this recipe for my daughter’s birthday celebration, as fruti tarts have always been her favorite celebration dessert. Your recipe was very easy to follow, and i used fat-free cottage cheese for the filling, and much to my surprise, it was WONDERFUL. I was satisfied with the overall outcome, but not THRILLED……and my family liked the filling and fruit topping, but the crust was left on most plates. While it was tasty, it was tough, almost too firm to cut with a fork. Your description defines it as “tender”, less firm than traditional shortbread, but sadly, mine was NOT. I did individual tarts, baked for 10 minutes, they did not seen burned or even toasted looking. The only thing I did differently was the use of Purecane sugar subsitute, but it is supposed to be identical to real sugar, used in equal measure to sugar in any recipe. What did I do wrong..how can I improve this crust for the next time? Thank you for your time.
Judy Purcell says
Hi Donna, thanks for letting me know you enjoyed the recipe and that the crust didn’t turn out as expected—it is so helpful to get feedback! I did a little research on the Purcane sugar substitute, which is primarily Erythritol, and found several sources noting it can cause some baked goods to be dry or tough. It also doesn’t brown like regular sugar or honey, which is why probably why the crust didn’t brown. They also mention refrigeration can cause crystallization and hardening. One suggestion I found to minimize the crystallization is to use the Confectioners version, which is a fine powder instead of the coarse granules (you can also pulse it in a food processor to break it down too). Lastly, reduce the baking time to 5 min, or until just set (long enough to cook the egg) but not brown. Let me know if the finer grind and less baking time works better … the only other thing I would try would be to add 1/2 of another egg, but try the other suggestions first. I hope this helps!
Ashley says
I can’t seem to get my hands on an 8” tart pan but I have an 11”. Any idea how to adjust the crust recipe? Also, if I am serving the same day do you think the glaze is necessary?
Thank you!
Judy Purcell says
That’s a great question, Ashley. In my research, each 1-inch increase in circumference is 25%, so a three inch difference is 75%. I would simply double the recipe for an 11-inch tart pan, which will mean it will be a little thicker (25%) than the photo, but totally fine. If you are serving the same day within a few hours, you shouldn’t need to glaze it unless you’re using a type of fruit that browns quickly, like pear. If you stick with berries, you’ll be fine. Let me know how it goes! And if you need quicker answers, you can message me on Facebook. 🙂
Healthy World Cuisine says
Absolutely stunning tart Judy! It is almost just too pretty to cut into. However, I think we would get over that quite quickly. Please save us a slice. Love your step by step photos
Shams says
Hi, Judy. Everyone should love Cream Cheese Fruit Tart recipe. As a health-conscious person, this will be perfect for me. A slice of tart with afternoon coffee is going to be interesting! 🙂
Karen (Back Road Journal) says
I totally agree with everyone…this is one beautiful tart.
chihyu says
I love this recipe! Now Spring is almost around the corner it’ll be perfect to make this dish over and over!
Anne Lawton says
This tart is so pretty and full of fresh fruit and it’s one of my favorite desserts because it’s not to sweet. I love the almond crust too!
Annemarie says
So pretty and flavorful! I love the almond flour crust for a GF version.
Hope says
This was so fresh and tasty! The crust was so easy to make, tasted good and you would never know that it was gluten free. Thanks for the paleo and dairy free options too 🙂
paleoglutenfreeguy says
This is gorgeous! I love your Paleo options and I love that you found a way to make a glaze that doesn’t involved 2 lbs. of powdered sugar. 😉
Raia Todd says
What a perfect treat for spring! I’m gonna have to track down all the ingredients and give it a try!
Vanessa says
This looks just wonderful! I love that the crust is grain free.
Kelly says
What a beautiful tart. Love all the fresh fruit on top!
Jean says
This looks amazing! I love a good fruit tart and that crust sounds perfect.
Tessa Simpson says
The whole buttery crust, tart fruit, and creamy filling was just TOO delicious! Couldn’t get it enough!
Joni Gomes says
Fruit tarts are my favorite dessert! I’m a huge fruit lover and love that you have a gluten free version with almond flour!
Emily Kemp says
This looks absolutely delicious, love the sound of that almond crust too!
Juliette says
Love serving this for brunch!
Jean says
How long would I bake crust if I use mini tart pans ?
Judy Purcell says
Jean, I would start at 4-5 minutes, and then check it every minute or so. Even if the crust gets a little more than lightly browned it won’t hurt it. Think of it like toasting almonds, which is what the crust is primarily. The darker the crust, the more toasted almond flavor. 🙂
Mandy - The Complete Book says
Oh Judy what a magnificent looking fruit tart. I will definitely be making this something later this season after things have warmed up just a little more.
Have a wonderful and happy day.
🙂 Mandy xo
Judy Purcell says
Thanks, Mandy, it is and easy one that everyone loves. I always think of my blogging friends on the other side of the world as our seasons change … it is getting colder here, so I know you are ready to feel the warm sun on your face there. 🙂
Karen says
I was so excited when I came across this recipe. I made it for my family last night and we all loved it. The crust was a little tricky to spread as it was very sticky, but well worth it. I will be making this again this weekend for Father’s Day. Thanks so much for a great recipe.
Judy Purcell says
Aw, thanks Karen for taking time to comment and let me know you liked it — that feedback is so helpful as well as encouraging. 🙂 Hope your family has a great Father’s Day weekend.
Monica says
Yum! Looks perfect for the summer, and I love all this fruit medley.
Geni says
This would be perfect at my Easter Brunch. Judy, you really hit the nail on the head for me. As I have gotten a little older, I realize that it’s much better to be relaxed and create a menu that is pleasant but not overly ambitious. Hospitality is really a much friendlier way to think of “having people over” than entertaining. What a great post!
Pauline Wiles says
This looks beautiful, I love the idea of almond flour and am very tempted by your ‘not too sweet’ description.
Judy Purcell says
Hi Pauline, thanks for stopping by and your kind comment, I appreciate that. It was great to discover your blog yesterday and your post about the conference you attended — really good stuff. Have a great week. 🙂
Mary@One Perfect Bite says
What a delicious looking tart. This must have been a hit with your friends. I know that I surely would enjoy it. I hope you have a great day. Blessings…Mary
Judy Purcell says
Hi Mary, thanks for stopping by and saying hello — have a great week!
john@kitchenriffs says
Great looking tart! I love fruit tarts, both because of their eye appeal and their flavor is so awesome. And I absolutely am with you on the different between entertaining and hospitality. We used to do the former, and now practice only the latter. Great idea for a series.
Judy Purcell says
Thanks so much John, the idea that the eyes take the first bite is so true–the beautiful fruit makes is especially appealing. Glad to know you can relate with the upcoming series, it is dear to my heart.
Raymund says
Really nice tart creation, love it. Nice colors too!
Judy Purcell says
Thanks Raymund, have a great Sunday! 🙂
Julia | JuliasAlbum.com says
This fruit tart is a creation of beauty! Love the shining fruit! And yes, having too many people over too often can really get overwhelming.
Judy Purcell says
Thanks Julia, I appreciate your kind comment! You are right, having too many, too often, can get overwhelming rather quickly–I learned to set healthy boundaries after crashing a couple of times. Knowing when to say ‘Yes’ is key. Good to see you in the comments again — have a great Sunday!
mjskit says
What a delicious looking tart! So colorful and yummy!!! Love the crust! Yes, I do know what you mean about hospitality vs. entertaining. We gave a dinner party last night and I had to keep reminding my husband, the perfectionist – “it’s o.k. if it’s not perfect. Let’s just have fun!” 🙂 Hope you’re having a great weekend!
Judy Purcell says
Hi MJ, I do hope you had a wonderful time with your dinner party, it is far more enjoyable when we let go of perfectionism–I know how hard that is too–and our guests are more at ease as well. The tart is delicious and beautiful on any table; good thing it’s easier to make than it looks (love food like that!). 🙂
Karen (Back Road Journal) says
Your photo is wonderful. I’m sure your friends enjoyed sharing this delicious dessert with you…I know I would.
Judy Purcell says
Thank you, Karen, the photos have gotten easier with the help from the lighting kit. Now I just have to learn my camera better — ha!
ChgoJohn says
What a beautiful tart, Judy! You really made your friends feel special when you set this on the table before them. Now *that’s* being hospitable!
Judy Purcell says
Thanks John, it does make someone feel special when you make that extra effort, though this it far easier than it looks. 🙂
Pure Complex says
I am in LOVE. I am I am just in love. I \have to try my hand at making this. Pretty and delish all at the same time.
Judy Purcell says
This is an easy one to fall in love with — who doesn’t like easy, delish, and beautiful?! 🙂
Maureen | Orgasmic Chef says
I’m in!!
This tart is so pretty. How clever you are. 🙂
Judy Purcell says
Thanks Maureen, we take the first bite with our eye, right?!
Jed Gray (sportsglutton) says
Perfect looking tart Judy. Wish I had a slice to enjoy with afternoon coffee. 😉
Judy Purcell says
So do I, but it is gone now. Guess I’ll have to make another one, just for afternoon coffee. 😉