Grilled pulled pork so tender and smoky you won’t believe it came from a grill instead of a smoker.
Follow these pro tips for low and slow barbecue to get close to pulled pork barbecue heaven with your gas or charcoal grill.
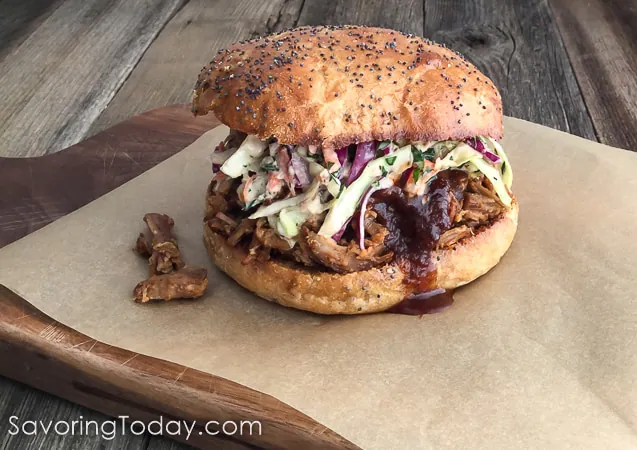
What if I told you it was possible to get close to pulled pork barbecue heaven with your grill? This Grilled Pulled Pork Sandwich Recipe includes key steps to get more smoke flavor with your gas or charcoal grill.
Just so we’re all on the same page, grilling is grilling and barbecue is barbecue.
Although the terms are used interchangeably, they are not the same thing.
Grilling is quick-cooking over a hot fire and barbecue is indirect, low and slow cooking with some serious, almost cult-like followers.
Without a doubt, pulled pork cooked on a smoker always beats grilled for deep smoke flavor, but more households own grills than smokers. So what’s an avid griller supposed to do when they want great barbecue?
Follow these key concepts of low and slow barbecue to get close to pulled pork barbecue heaven with your grill. Here’s a quick reference to skip to the info you’re looking for most.
Table of contents
This post may contain affiliate links. See our disclosure policy for more information.
Get More Smoke Flavor From a Gas or Charcoal Grill
Set up two-zone heat; direct and indirect
- Gas grill: Turn on only one side of the grill and leave the other side off. If the grill ordinarily runs hot or cold, you’ll have to adjust the settings to maintain a temperature of around 325 degrees.
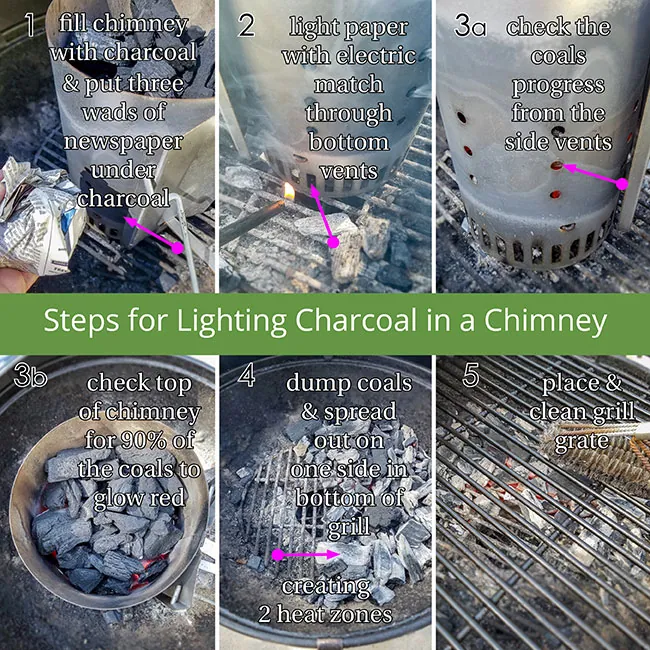
- Charcoal grill: Build your fire in a chimney starter, and once the coals are hot and ready, spread them out over one side of the bottom of the grill. Adjust the bottom and lid vents to maintain a temperature of around 325 degrees.
Add water for better temp control and smoke flavor
- A water pan placed directly over the heat stabilizes the temperature and creates moisture, which helps smoke flavor cling to the meat. An inch or two of water in a disposable aluminum pan works great and if you have a small grill, a mini loaf pan (5x3x2-inch) saves space.
- Using a spray bottle with apple juice, beer, or chicken broth to moisten the surface of the meat while cooking also helps the smoke flavor adhere to the meat. This is especially helpful for cooking times over 30 minutes or anytime the meat appears dry.
Add real hardwood in 3 ways:
1. Soaked wood chips will smolder, creating wisps of smoke and flavor. Check your grill manufacturer for guidance and accessories for adding wood chips on gas grills, or see below.
On charcoal, you can place chunks of wood chips directly on top of hot coals. It doesn’t take much, and you don’t want to overdo it and dampen your fire. Start with only one or two larger wood chunks or no more than 1/2 cup of chips, a little larger than postage stamps.
Note: Only use food-safe wood chips; NEVER use wood scraps or treated lumber.
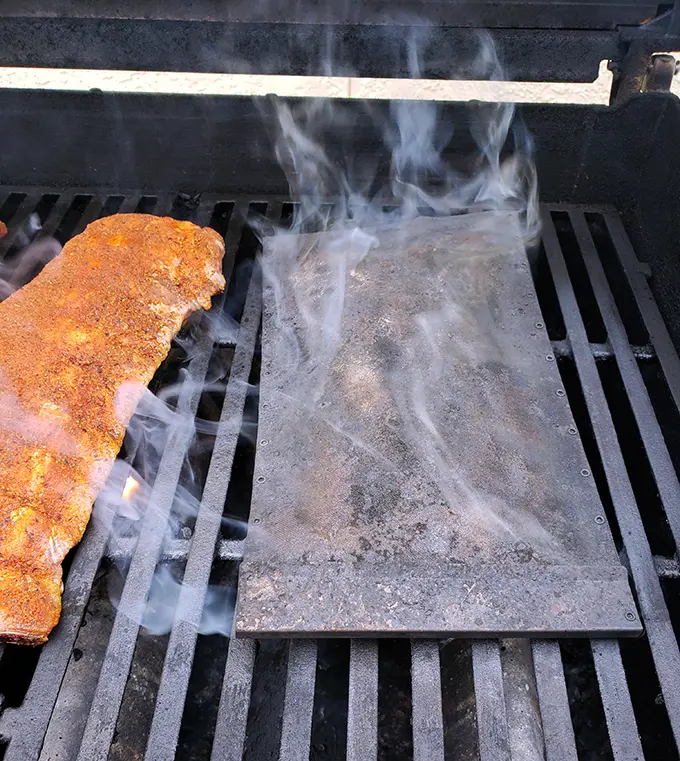
2. Use a stainless steel smoking pouch with hardwood chips
There are many grilling gadgets out there, but this stainless steel smoker pouch is the real deal. I find it most useful when using my gas grill, but I’ve used it on gas and charcoal. Just fill the pouch with the small wood chips (no soaking required) and lay it on the grates over direct heat. It will produce a nice stream of smoke for about 20 minutes, perfect for steaks and boneless, skinless chicken breasts.
TIP: For longer smoke times, purchase a second pouch to readily switch out when needed (trying to refill a hot pouch is tricky).⇒ I highly recommend it for easy use and real wood smoke flavor results.
3. The Slow and Sear Plus makes a two-zone setup a snap and has a built-in water reservoir, which helps to insulate the food from direct heat.
I can use less charcoal because the contoured charcoal basket is so efficient. Last week, I grilled/smoked two racks of ribs for over an hour with only half a chimney of natural wood lump charcoal and a few wood chips.
In the long run, the Slow and Sear is an inexpensive way to convert a kettle grill to a smoker. The video below shows what the insert looks like in my own 22-inch kettle grill.
Finish the grilled pork low and slow for tender perfection
When the smoke clears, it’s time to slide it all in the oven to finish. Place the grilled meat on a rack set inside a roasting pan and pour a beer in the bottom of the pan.
Cover tightly with foil and cook at 325 degrees (between 1-2 hours) until the internal temp of the meat reaches 200 degrees and it easy twists under the pressure of a fork.
TIP: This internal temperature is important so that the collagen begins to melt, producing a more pleasant texture. Cooking time will depend on how thick the pieces are and the overall quantity you are cooking. The recipe below is based on 4-5 pounds of meat.
- A note about slow cookers: You can finish the pork in a slow cooker, but I don’t recommend a slow cooker for two reasons. This appliance is a set-and-forget method, and you’ll need to keep an eye on the internal temp of the pork for doneness.
- Too often, meat is overcooked and dry because it is left too long in a slow cooker. The meat must also be stacked with the bottom portion resting in liquid, which you don’t want.
Temperature trumps Time
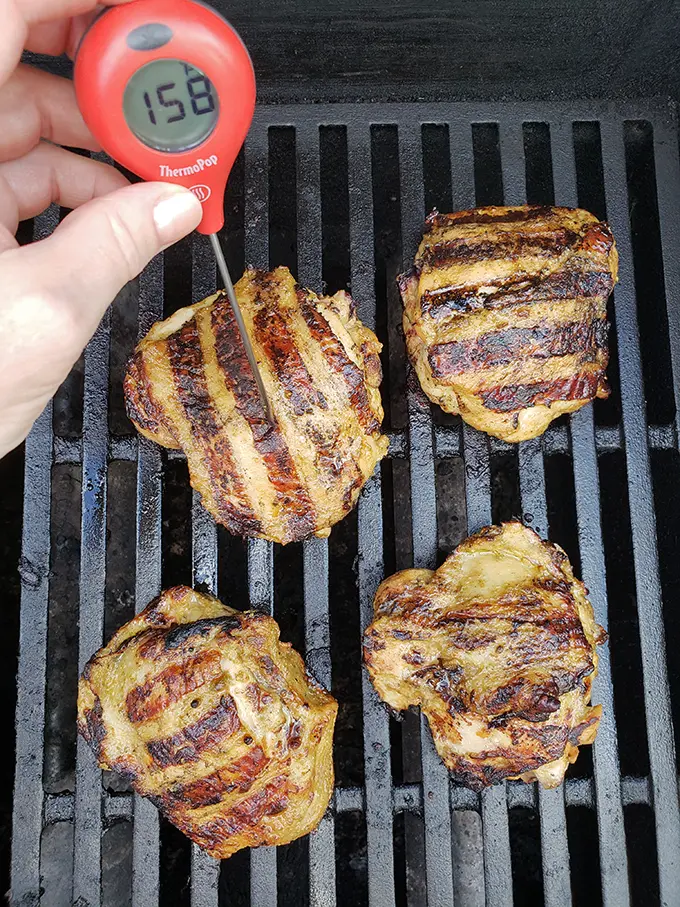
If you’re grilling without an instant-read thermometer, it’s time to elevate your game and stop guessing about doneness. Great grilling or barbecue relies more on temperature than time. There are so many variables; any grilling recipe that depends on timed doneness alone will always be a shot in the dark.
Everything you cook on the grill will be better if you follow temperature for doneness.
Get the most out of dry rubs and time on the grill
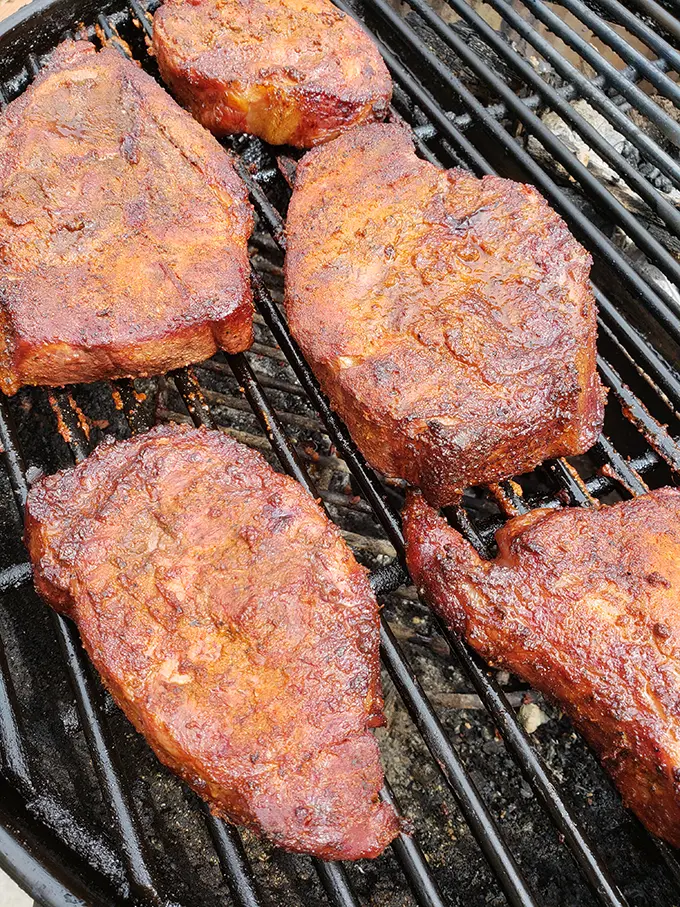
Smaller portions of meat will produce a more smoky flavor and reduce cooking time. Forget the full pork shoulder roast, also known as pork butt or Boston butt, and go for the boneless country-style ribs (not really ribs at all).
Country-style pork ribs are the best pork cut for pulled pork using a grilling method for three reasons.
- There’s more surface area in contact with the rub seasoning and the smoke, yielding a better flavor
- The smaller pieces cook faster
- The smaller pieces are easier to “pull” or separate into strips when it’s done
TIP: Butchers slice the pork shoulder/butt to make country-style ribs and if the shoulder blade is left in, you’ll find bone-in country-style ribs. Because it is reduced to manageable pieces, there’s more surface area for the flavor of the rub and smoke to penetrate (ideal for grilling).
Using the techniques described above, it should only take 45 minutes to an hour on the grill to pick up a good amount of smoke flavor—you’re not trying to cook it through at this point because it will finish in the oven.
Of course, you can let it go longer if the wood chips are still providing good smoke and you have the time to monitor temps and keep the surface moist when needed.
Grilled Pulled Pork Recipe Step by Step
- Rub the boneless pork ribs with the spice rub seasoning and refrigerate for at least 4 hours or overnight. *Remember to prepare any wood chips for grilling, if necessary.
- Light the grill with the intention of creating 2 heat zones, prep water pan, and wood chips kit.
- Once the grill is at 400°F, place the meat over indirect heat. Reduce heat to keep the temperature around 325°—grill for about 30 minutes before rotating the meat so the closest to the heat source changes.
- Brush or spritz the meat with apple juice or beer to keep the surface moist—grill for another 30 to 40 minutes.
- Transfer the pork to a roasting pan and pour beer in the bottom of the pan. Cover tightly with aluminum foil and cook in the oven at 325°F until pork is 200°F internal temperature when testing the thickest piece.
- Remove from oven and cool. Pull pork apart with your fingers.
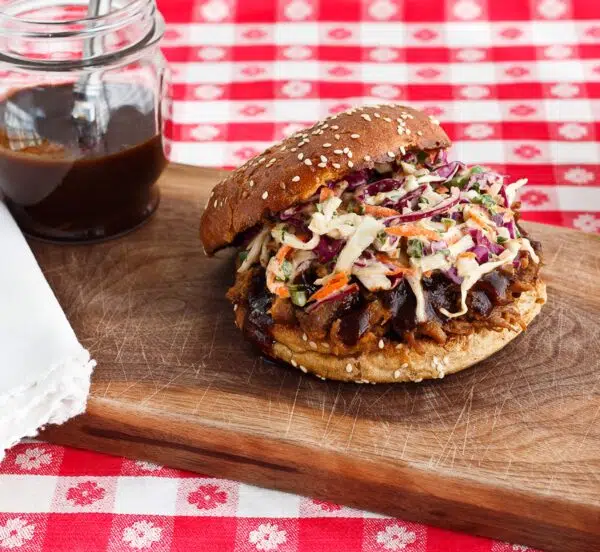
- Toast the buns by lightly buttering each slice and place under the broiler on HI for 3-4 minutes until golden brown. When ready to serve, reheat the pork with barbecue sauce mixed-in for 2-3 minutes.
- Serve 1/2-2/3 cup per serving on each toasted bun, or serve plain with sauce on the side.
- Top with a scoop of coleslaw for the perfect finish.
TIP: Strain and skim fat from juices in the pan. Taste to determine if the juices are suitable to pour over the shredded pork (if you like the flavor, it’s a yes)–add a small amount of water or chicken broth to dilute if needed. This liquid can be reserved to moisten the pork when reheated or pour a little into each bag when storing for later meals. (Any leftover juices can be frozen for adding to soups.)
Grilled Pulled Pork BBQ Sandwiches
Ingredients
- 2 tablespoon hickory smoked sea salt or flaked kosher salt
- 2 tablespoons coconut palm sugar or brown sugar
- 2 teaspoons smoked paprika
- 2 teaspoons mustard powder
- 1 teaspoons ground cumin
- 1 teaspoon granulated onion
- 1 teaspoon granulated garlic
- 1 teaspoon black pepper
- 1/2 teaspoon chipotle chile powder
- 4 pounds country-style pork ribs (4-5 lbs)
- 12 ounces beer — or 1/2 cup each of apple juice , apple cider vinegar, and water
- Homemade Sandwich Buns — toasted
- Coleslaw — optional
- Special Equipment: spray bottle (optional)
Instructions
- In a small bowl, combine the first eight ingredients and mix well. Arrange the pork ribs on a rimmed baking sheet and rub seasoning evenly over the pork to coat.
- Place in a zipper bag and refrigerate at least 4 hours or overnight. *Remember to prepare any wood chips for grilling, if necessary.
- Remove pork from refrigerator and bring to room temperature while lighting and prepping a gas or charcoal grill with wood chips and water pan, with direct and indirect heat zones.
- Once the grill is at 400°F, place meat on the grill over indirect heat leaving an inch in between the pieces to not crowd and allow smoke to circulate. Reduce heat to keep temperature around 325°F and grill for about 30 minutes before rotating the meat so the closest to the heat source changes. This is a good time to quickly brush or spray the meat with apple juice or beer to keep the surface moist. Grill for another 30 to 40 minutes.
- Note: During this time, wood chips should be producing a steady stream of smoke. Grilling time can be extended as long as the wood chips are smoking and the internal temperature of the meat doesn't go above 200 degrees.
- Once the meat has been on the grill for an hour or so, heat oven to 325°F. Transfer the pork onto a rack inside of a roasting pan in a single layer and pour beer in the bottom of the pan.
- Cover tightly with aluminum foil and cook in the oven about 2 hours or until pork is 200°F internal temperature when testing the thickest piece. The exact time will depend on the thickness, so it is important to check after the first hour.
- Once the pork has reached 200°F and is tender, transfer to a rimmed baking sheet until cool enough to handle.
- Using your hands, pick up chunks of the pork and rub it between your thumb and fingers to shred, removing bone, connective tissue and fat as you go. (I like to wear surgical gloves for things like this.)
- Optional: Strain and skim fat from juices in pan. Taste to determine if the juices are suitable to pour over the shredded pork (if you like the flavor, it's a yes)–add a small amount of water or chicken broth to dilute if needed.
- This liquid can be reserved to moisten the pork when reheated or pour a little into each bag when storing for later meals. (Any leftover juices can be frozen for adding to soups.)
- Toast the buns by lightly buttering each slice and place under the broiler on HI for 3-4 minutes until golden brown. When ready to serve, reheat the pork with barbecue sauce mixed-in 2-3 minutes.
- Serve 1/2-2/3 cup per serving on each toasted bun, or serve plain with sauce on the side. Top with a scoop of coleslaw for the perfect finish.

Ivana says
Had this for lunches over the weekend — SOOOO good!
Laura Duffy says
Thanks for all of the detailed instructions. I am clueless about grilling, so your tips are helpful for this yummy recipe, to say the least!
chihyu says
I can taste all the delicious flavor from the pulled pork sauce here. So delicious!
Anne Lawton says
this sounds so good! I love making BBQ pork on the grill, thanks for sharing all of your tips!
Kelly says
Oh those spices and that flavor, yum. I can taste it through the screen. Well done!
Kari - Get Inspired Everyday! says
Oh my goodness your pulled pork looks amazing and thanks for all the tips too!
Tessa Simpson says
I love using this trick too! I don;t have a smoker, so took to wrapping soaked chips in aluminum foil and placing them in the grill for a the same effect….it works so darn well! Never thought to use it for pulled pork, I must!!
paleoglutenfreeguy says
Just bought my first gas grill and can’t wait to try this on it! Pulled pork is one of my absolute favorite things.
Amy Sheree says
I LOVE pulled pork! This looks absolutely amazing!!
Megan Stevens says
I have almost no grilling experience, and love that I can learn from someone who has so much! Pinning this, thanks!
Joni Gomes says
You had me at pulled pork! All of these spices really do give you that “smoke” flavor which I love! Also, coleslaw is a must!!
Raia Todd says
That sandwich looks amazing! I’ve never made pulled pork before.
mjskitchen says
Bobby is the smoker in this house so I’m sending him this post. He’s going to love all the great tips! That sandwich is mouthwatering!
John/Kitchen Riffs says
Some terrific tips! And thanks for the intro to Mo’s — new to me. Love grilling/smoking and all that outdoor cooking. Best part of summer!
Judy Purcell says
Thanks John! I agree, it is the best part of summer! I think you’ll appreciate adding Mo’s pouch to your grilling routine. 🙂